samba 部署和优化--实践
samba 部署和优化--实践
(2)samba 实践
A.Samba 实践一
要求:共享一个目录,任何人都可以访问,即不用输入密码即可访问,要求只读
打开 samba 的配置文件 /etc/samba/smb.conf 在 [global]部分
把 MYGROUP 改为 WORKGROUP,把 security = user 改为 security = share 。然后在文件的最末尾处加入一下内容:
[share]

        comment = share all

        path = /tmp/samba

        browseable = yes

        public = yes

        writable = no
创建测试目录:
[root@133 ~]# mkdir /tmp/samba

[root@133 ~]# chmod 777 /tmp/samba

[root@133 ~]# touch /tmp/samba/sharefiles

[root@133 ~]# echo "11111" > /tmp/samba/sharefiles
启动 samba 服务:
[root@133 ~]# /etc/init.d/smb start

启动 SMB 服务:                                            [确定]
下面来测试一下是否能满足我们的要求,首先测试配置的 smb.conf 是否正确,用下面的命令:
[root@133 ~]# testparm

Load smb config files from /etc/samba/smb.conf

rlimit_max: increasing rlimit_max (1024) to minimum Windows limit (16384)

Processing section "[homes]"

Processing section "[printers]"

Processing section "[share]"

WARNING: The security=share option is deprecated

Loaded services file OK.

Server role: ROLE_STANDALONE

Press enter to see a dump of your service definitions
看到了有个 WARNING,不过影响不大,忽略了。在浏览器上输入 file://IP/share
也可以在运行栏输入 \IP 回车,即弹出:
B.Samba 实践二
要求:共享一个目录,使用用户名和密码后才能访问,要求可读写
打开配置文件 /etc/samba/smb.conf
[global] 部分内容如下:
[global]

        workgroup = WORKGROUP

        server string = Samba Server Version %v

        security = user

        passdb backend = tdbsam

        load printers = yes

        cups options = raw
还需要加入如下内容:
[myshare]

        comment = share for users

        path = /samba

        browseable = yes

        public = no

        writable = yes
保存配置文件,创建目录:
[root@133 ~]# mkdir /samba

[root@133 ~]# chmod 777 /samba
然后添加用户。因为在[global]中“passdb backend = tdbsam”,所以要使用 pdbedit 来增加用户,注意添加的用户必须在系统中存在,所以需要先创建系统账号:
[root@133 ~]# useradd user1

[root@133 ~]# useradd user2
然后添加 user1 为 samba 账号:
[root@133 ~]# pdbedit -a user1

new password:

retype new password:

Unix username:        user1

NT username:

Account Flags:        [U          ]

User SID:             S-1-5-21-2559066706-2195907696-3818258841-1000

Primary Group SID:    S-1-5-21-2559066706-2195907696-3818258841-513

Full Name:

Home Directory:       \\133\user1

HomeDir Drive:

Logon Script:

Profile Path:         \\133\user1\profile

Domain:               133

Account desc:

Workstations:

Munged dial:

Logon time:           0

Logoff time:          三, 06 2月 2036 23:06:39 CST

Kickoff time:         三, 06 2月 2036 23:06:39 CST

Password last set:    日, 26 6月 2016 15:06:13 CST

Password can change:  日, 26 6月 2016 15:06:13 CST

Password must change: never

Last bad password   : 0

Bad password count  : 0

Logon hours         : FFFFFFFFFFFFFFFFFFFFFFFFFFFFFFFFFFFFFFFFFF
再把 user2 添加为 samba 账号:
[root@133 ~]# pdbedit -a user2

new password:

retype new password:

Unix username:        user2

NT username:

Account Flags:        [U          ]

User SID:             S-1-5-21-2559066706-2195907696-3818258841-1001

Primary Group SID:    S-1-5-21-2559066706-2195907696-3818258841-513

Full Name:

Home Directory:       \\133\user2

HomeDir Drive:

Logon Script:

Profile Path:         \\133\user2\profile

Domain:               133

Account desc:

Workstations:

Munged dial:

Logon time:           0

Logoff time:          三, 06 2月 2036 23:06:39 CST

Kickoff time:         三, 06 2月 2036 23:06:39 CST

Password last set:    日, 26 6月 2016 15:07:28 CST

Password can change:  日, 26 6月 2016 15:07:28 CST

Password must change: never

Last bad password   : 0

Bad password count  : 0

Logon hours         : FFFFFFFFFFFFFFFFFFFFFFFFFFFFFFFFFFFFFFFFFF
可以列出 samba 所有账号:
[root@133 ~]# pdbedit -L

user1:502:

user2:503:
重启 samba 服务:
[root@133 ~]# service smb restart

关闭 SMB 服务:                                            [确定]

启动 SMB 服务:                                            [确定]
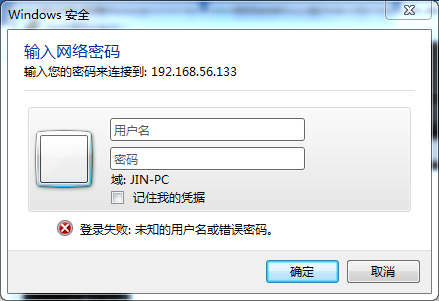
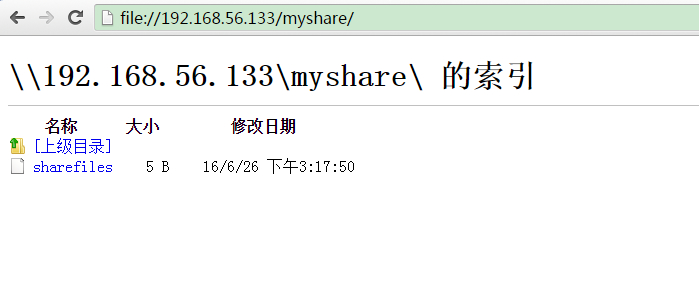
测试:浏览器访问 file://IP/myshare/
使用 Linux 访问 samba 服务器
samba 服务在 Linux 下同样可以访问,前提是你的 Linux 安装了 samba-client 软件包。之后就使用 smbclient 命令,语法为: #smbclient //IP/共享名 -U 用户名
如:
[root@128 ~]# smbclient //192.168.56.133/myshare/ -U user2

Enter user2's password:

Domain=[WORKGROUP] OS=[Unix] Server=[Samba 3.6.23-35.el6_8]

smb: \>
出现如上所示界面。可以打一个?列出所有可以使用的命令。其中 get 是下载,put 是上传。
smb: \> ?

?              allinfo        altname        archive        blocksize

cancel         case_sensitive cd             chmod          chown

close          del            dir            du             echo

exit           get            getfacl        geteas         hardlink

help           history        iosize         lcd            link

lock           lowercase      ls             l              mask

md             mget           mkdir          more           mput

newer          open           posix          posix_encrypt  posix_open

posix_mkdir    posix_rmdir    posix_unlink   print          prompt

put            pwd            q              queue          quit

readlink       rd             recurse        reget          rename

reput          rm             rmdir          showacls       setea

setmode        stat           symlink        tar            tarmode

timeout        translate      unlock         volume         vuid

wdel           logon          listconnect    showconnect    ..

!
另外的方式就是通过 mount 挂载了,如:
[root@128 ~]# mount -t cifs //192.168.56.133/myshare /mnt -o username=user2,password=test2

[root@128 ~]# ls /mnt

sharefiles
格式就是这样,要指定 -t cifs //IP/共享名 本地挂载点 -o 后面跟 username 和 password, 注意共享名后面不能有斜杠。
开机自动挂载:
# vim /etc/fstab

   //192.168.0.237/myshare /samba                            cifs    defaults,username=user1,password=83719730 0       0